Decorative edges around fireplace
by Mark
(Southampton)

overview
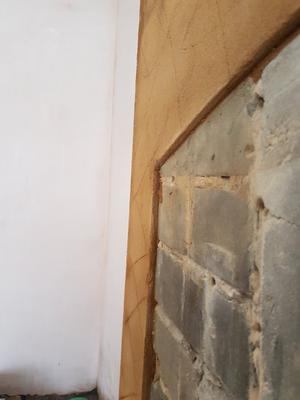
Hi Paul, I'm working on the chimney breast as you will see from the pics. Plan is to install a woodburner, and we'd like to keep the original bricks as the fireplace. I've laid on a coat of sand/cement backing plaster, and am about to skim. But I'm wondering how's best to finish the edges where the plaster ends and leaves a step down to the brickwork (see the close-up pic). Should I round off the corner of the backing coat and try to skim over it? Just skim up to the dege - but then I'm concerned that you'll see the different layers even after painting, create a chamfer somehow....???
Also, can I just sanity check, that since I'm not skimming right next to where the woodburner will go that I'm okay to use standard multi-finish and don't need to use a heat resistant plaster?
Any help/advice gratefully received.
Answer
Hi Mark,
In a way you have answered your own question, there is I'm afraid no easy way and you could do all that you have suggested. Either way can take a long time, so prepare yourself for some fiddly work. There is just one alternative, if you did want nice clean straight lines you could stick a skim stop bead or sometimes called thin coat stop bead. This will give you a 2 mm lip and can be set just 1mm below the base coat, to then allow this to also be skimmed. The thin coat stop bead would as such form the external corner for you.
Without knowing all the details - it looks as if you should be okay to just use multi-finish, unless you're expecting to really fire it up!
Hope this helps
Paul
Comments for Decorative edges around fireplace
|
||
|
||
|
||
|
||
|
||
|
Click here to add your own comments Join in and write your own page! It's easy to do. How? Simply click here to return to General Help. |


