Tadelakt finish - burnishing
Burnishing is defined:
To make smooth or glossy by rubbing or polish.
To rub with a tool that serves to polish or smooth
To achieve a lustre
Once the tadelakt has been flattened and initially compressed with a float and trowel, burnishing can take place when the tadelakt is firm enough.
Olive oil soap is first painted on to the wall and then rubbing with the stone can commence.
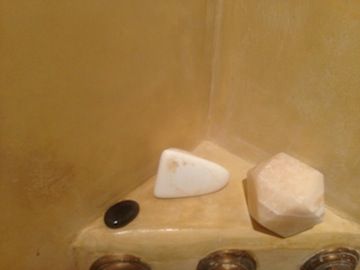
A range of stones are shown above - all of which have there own particular use.
The black one is ideal for getting into all the awkward places and for forming a very slight radius to internal corners.
The white one is a ceramic stone specifically manufactured for burnishing. Its hard, smooth convex surface being ideal to transfer firm pressure to a small area without scuffing or digging in to the surface.
The onyx shaped stone is ideal where a perfectly flat and sharp internal corner is required - or to achieve a flatness to any edge, but care has to be taken to prevent the edges from digging in.
Setting & Drying
If using a hydraulic lime then the setting process can start to harden the tadelakt enough over a few days to enable burnishing to be carried out. This will be in addition to the drying process that can only be relied upon if a non hydraulic lime is used.
If burnishing takes place too early, before it is hard enough, then the tadelakt can start to wear off the wall onto the stone. (This is evident on the white stone in the above picture.)
Olive oil soap for the tadelakt finish.
An olive oil soap diluted with water is ideal for this burnishing process, that provides a glossy breathable yet waterproof finish.
Return from tadelakt finish to tadelakt instructions.